I taught our preschool co-op today. I loosely based the theme on Thanksgiving, focusing more on fun turkey stories and the feast than the historical elements. We have two more weeks before the actual holiday and no doubt the other moms will emphasize the historial significance and spiritual characteristics. Plus, I had a migraine last night and didn't get my lesson together until early this morning. Talk about putting things off until the last minute.
Anyways, on to the lesson...
We started our circle time discussing the upcoming holiday and talking about what a feast is and the foods we like to eat at Thanksgiving. Then, we read A Plump and Perky Turkey .
.
 Such a cute book! We've had that one checked out from the library a while now and it's been fun to read and reread.
After we read that, we talked about how Pete and the other turkeys in Squawk Valley were disappearing around Thanksgiving time because they didn't want to end up as dinner. I drew a turkey on our chalkboard easel and told the kids that they were going to help our turkey drawing disappear too.  They got to decide which parts of the turkey to erase {disappear} first but they had to tell me a rhyming word instead of the word itself, i.e. street instead of feet, weather instead of feather. They needed a little help with this at first since it's a new concept to them but they were getting it pretty well by the end.
For our turkey craft, we went on a walk to find maple leaves. We gathered several and came home to make our turkeys. The children glued their turkeys together. {I found the template here and cut out all pieces on construction paper beforehand.}  They did an excellent job putting their turkeys together and gluing on the collected maples leaves as the feathers.
  It amazes me how much more independent they've become in just the last 9 months. When we first started this co-op we had to help them a lot with activities like this. Now they listen to the instructions, see the example, and try on their own before asking for help. It's such a joy to see the progress!
We read another book, Run, Turkey, Run! .
.  It's a fun book and the kids got a kick out of the turkey running from the farmer, trying to hide with all of the other farm animals. I had originally planned to go outside after reading it so the kids could pretend to be turkeys like the one in the book, running and hiding to see if the farmer (me) would find them. But we ran out of time.
Back to the "feast" part of the lesson, I had the kids sit down at our kiddie table for a little Q&A on table manners. I asked them questions about how they chew {with mouths closed}, what the polite way to ask for more food is, where they should put their utensils when they're not using them, etc. I gave them each construction paper place mats that had place settings drawn on them.  I told them about how to set a table and gave each of them a full place setting to practice with, using their place mats as a guide.

We talked about how we thank God for our food before we eat and that everything comes from Him. One of the little girls taught us a new prayer she just learned for mealtime.
We learned how God gives us so many good things, including the wonderful foods we get to eat. I made cornucopias out of lunch bags with our verse of the day written on them, Psalm 145:7. The kids scooped out popcorn, dried cranberries, raisins and chocolate chips to fill up their cornucopias.


 I'd love to find some simple wooden or brown paper boxes to put each one in. But I haven't found ones I like that are inexpensive enough and then there's the storage factor. Where do you stash 25 boxes? So this year, until I figure out something else, I'm using brown paper sacks.
 I made little tags with the Advent day's number on them. I had a stack of small cardboard inserts from bias tape packages that I saved. I cut them in half, rubbed the edges with a brown ink pad, and stamped the number on.


 It's just a small stick we found in the backyard, pulled the bark off, shaped with a knife and screwed an eyelet screw into the top of.
 We learned about what doctors do. I wanted to take Boo up to the hospital to see Daddy at work but we ended up doing that several weeks later insted.

 We made crescent dogs for a picnic lunch one day and dubbed them Diggity Dogs to go with our letter D theme. Boo helped wrap the dogs in crescent rolls before I popped them into the oven.
 We read about dinosaurs and Boo painted a small wooden dinosaur plaque with acrylic paints.
 Throughout that week (or two) we practiced Spanish words starting with D: dinero, durazno, diente, diez. We also made a peach {durazno} crostata, and Boo learned his letter D bible verse: Psalm 34:14.

 I really wanted the ten commandments written out on the tablets, rather than scribbled illegible text. This way we can read through them together. I looked to two of Boo's children's bibles for a kid-friendly translation of the text. Though I was tempted to put the original text from Scripture - that would be great too.
 I hot-glued them together in the bottom corner, backed them with gray paper and glued a support strip of more gray paper to the middle back.


 A lion for Day 18 of our Jesse Tree, a devotional on Daniel and God's protection in the lions' den. I found this at Cost Plus World Market recently.
 Day 8 of our
 Here's what you need: tumbled tile {I used travertine}, rubber or felt bumper pads, staz-on permanent ink pad, patterned and initial stamps, post-it note.
 Cut a small square out of the top of the post-it note being sure that the sticky part is on the back of your square. Stick the square in the center of your tile.
 Rub StazOn ink on a large script {any fine pattern would work} stamp.
  Press firmly on the tile.
 Whoops. I was a little heavy-handed on the ink on the top right. No worries. It doesn't have to be perfect. Peel off your Post-It square and place it in the center of the next tile. Repeat with all tiles.
 I like when there are gaps in the pattern. Don't go to great lengths to squash the stamp on the tile. A little give to it adds character.
 Pull out your initial stamps.
  I bought a set of these at Hobby Lobby years ago when they were 50% off. NEVER buy anything full price at a craft store. There are always 40% off {or more} coupons to use and Hobby Lobby is the greatest because they regularly reduce their merchandise to half off.
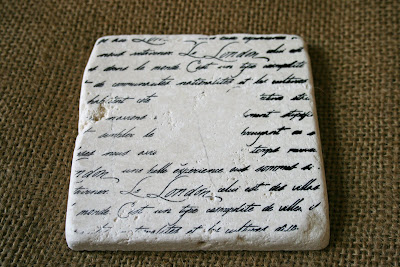
 Gorgeous!
 Wrap with a bow and give as a Christmas gift or housewarming present.
 Don't use regular ink. Be sure to buy StazOn or another brand of permanent ink so that when the coasters are used, the ink won't run.
 To make it, I started with an unpainted wooden pirate's ship from Hobby Lobby.
  We ripped off the sales and cut off the masts.
 I used an extra fine point sharpie to draw planks of wood and nail holes on the roof, then painted the whole thing with brown acrylic paint.
 I plan on attaching several pairs of felt animals on the top deck but won't finish that in time for this year.
 He made this umbrella. {sorry it's blurry}
  He had to piece together the umbrella stripes, connect the dots to make the handle, and glue on raindrops all over.
 For another letter U umbrella craft, see Allie's
  He created a face with all of the pieces. He had to think about how high up to put the ears, where the lips are in relation to the chin, etc.
 It was fun and he was so excited to show off all of his crafts when Daddy got home.

