

Valentine's Day Handprint Placemat
Hello friends! Busy week. Sorry for the lack of posting and possibly making you hungry every time you click over here and see that gyro plate. Looking at it just now made me wish that's what we were having for dinner tonight! Leftovers instead.
Anyways, I've mentioned before that we like to make handprint art placemats on different holidays. This week we worked on a Valentine's Day placemat. I've yet to get it laminated, but here it is. The boys love doing these handprints. I've found the best way to not make a huge mess is to use a foam brush to paint the paint on the child's hand.
  Then, I have them press their handprints down on white computer paper, not the actual placemat paper. So if we get smudged prints, we don't have to redo the whole thing and waste a big piece of paper. Instead, I cut out each handprint and arrange them on the placemat paper with double stick tape.

 We're happy we'll have another placemat to add to our collection.

 Here's what you need: tumbled tile {I used travertine}, rubber or felt bumper pads, staz-on permanent ink pad, patterned and initial stamps, post-it note.
 Cut a small square out of the top of the post-it note being sure that the sticky part is on the back of your square. Stick the square in the center of your tile.
 Rub StazOn ink on a large script {any fine pattern would work} stamp.
  Press firmly on the tile.
 Whoops. I was a little heavy-handed on the ink on the top right. No worries. It doesn't have to be perfect. Peel off your Post-It square and place it in the center of the next tile. Repeat with all tiles.
 I like when there are gaps in the pattern. Don't go to great lengths to squash the stamp on the tile. A little give to it adds character.
 Pull out your initial stamps.
  I bought a set of these at Hobby Lobby years ago when they were 50% off. NEVER buy anything full price at a craft store. There are always 40% off {or more} coupons to use and Hobby Lobby is the greatest because they regularly reduce their merchandise to half off.
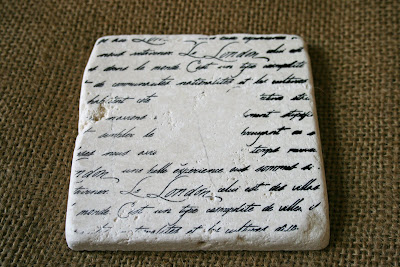
 Gorgeous!
 Wrap with a bow and give as a Christmas gift or housewarming present.
 Don't use regular ink. Be sure to buy StazOn or another brand of permanent ink so that when the coasters are used, the ink won't run.
 It's fun to see how the kids' prints grow and to look back and remember who was celebrating with us. We make everyone present participate!
 I've found that the best way to ensure clear handprints is to use a foam brush to paint the acrylic paint onto people's hands.

 As for turning it into a placemat, Office Max will laminate anything smaller than 11 x 17" for around $2 per sheet. Check your drawing paper and trim if needed to keep it smaller than that size. If it's bigger, you'll have to have it roll laminated which costs more than twice as much.
 The other day, however, when I went to wrap a birthday gift for a kid's party, my stash failed me. No bag was the right size and I didn't have any birthday wrapping paper. Newspaper comics was my first thought. And then, Boo asked to go paint on his easel.
  Perfect! I could use his paintings as wrapping paper.

 I used scraps I had on hand so it didn't turn out to be a stellar gift topper. But I don't think the three year old recipient cared anyways.

