 Since moving here, we've really missed the incredible restaurants we had back in Texas. {We didn't eat out much but when we did we had the most wonderful places to choose from. I won't even go into the poor excuse for Mexican restaurants here. My, we miss our TexMex.} One such place that I have craved many times since relocating is Niko Nikos. Good heavens are their gyros the best! Made fresh when you order, wrapped up in foil with a pile of seasoned fries and yummy tzatziki. They're so good and worth waiting in a line out the door for.
Since we only make it back home once or twice a year, my gyro craving has been left totally unsatisfied. I was determined to figure out a way to duplicate them here. Honestly, I was skeptical that I could even come close. I mean, how exactly do you make gyro meat at home. It's lamb and beef pressed together and roasted rotisserie style. I don't have a rotisserie and wasn't confident I could create the right meat mixture. But after a lot of research (and some great tips from Alton Brown), I've finally found just what we've been missing so much! So here's my gyro and tzatziki recipes. No fancy equipment required. And no waiting in line either.
Let's start with the gyros. Here's our ingredient list for the meat:
 1 lb. ground lamb
1 lb. ground beef, 80% lean
2 heaping teaspoons oregano
2 tsp. marjoram
2 tsp. kosher salt
½ tsp. ground black pepper
1 medium onion
3-4 garlic cloves, minced or crushed
First, chop the onion. No need for a fine dice here, just give it a rough chop. Dump the onion into a food processor.
 Puree the onion for about 30 seconds, pausing to scrape down the sides.
 Dump onion puree onto paper towel {I use two paper towels for this for added strength}.
  Squeeze out the onion juice. Discard juice or save for another purpose.
 Put the drained onion puree back in the food processor. Add remaining ingredients and pulse until well combined. {Note: I have a rather small food processor so I couldn't fit both pounds of meat. Instead, I blended the spices with the lamb in the food processor and then in a bowl mixed the lamb mixture with the beef.}
Press the meat mixture into a loaf pan being sure to pack it down well. Bake at 350 degrees for an hour.

Remove the meatloaf from the oven and set on a wire rack.

Now, place a layer of foil over the meatloaf and set something heavy on top. I used two quarts of chicken stock but a brick or a couple of heavy cans would also do the trick.

The idea here is that you keep the meat pressed down tightly as it cools. Cool for 30-45 minutes with the weights. Remove weights and wrap in plastic wrap. Refrigerate overnight. {Chilling overnight isn't crucial but I think it helps develop the flavors.}
Remove from refrigerator and unwrap. Thinly slice the meatloaf. I use an
electric knife
for this.

To brown the strips of meat, heat 1 tablespoon of vegetable oil in a skillet over medium high heat. Add several strips of meat in a single layer.

Brown for approximately two minutes per side.

Remove meat from pan to a plate covered with a paper towel.

Add another batch of meat to the pan. No need to add more oil. Repeat in this manner until all meat is browned.
Now for the tzatziki sauce. Tzatziki is a delicious greek yogurt sauce. Mmm. I love this stuff.
Here's what you need for the sauce:
 1 ¼ cup greek yogurt
1 English hothouse cucumber2 cloves garlic
½ tsp. dill
2 Tbsp. lemon juice {or half lemon squeezed}
Generous pinch of kosher salt
Pinch ground pepper
Generous pinch of sugarFirst, peel and seed the cucumber. To seed it, slice the cucumber in half lengthwise and scoop seeds out with a spoon.


Grate the cucumber.

Gather up the pile of grated cucumber in a tea towel or two layers of paper towels. Squeeze out the liquid and discard.

Mix the drained cucumber with the yogurt and remaining ingredients.
Cover and refrigerate several hours or overnight. Taste for seasoning. {I added a bit more sugar and salt.}

To serve the gyros, wrap in pita bread with tzatziki sauce, sliced onion and tomato.

I use
this recipe for pita bread as suggested by my friend
The Prairie Girl.

Click for the printable recipes:
Lamb and Beef Gyros and
Tzatziki Sauce.


 We have one that my auntie gave me when Jacob was born. We love it!
 Flowers to practice buttoning. A ladybug that unzips to reveal...
 mini ladybugs.
 Color matching velcro balloons. The apple tree is a favorite page of ours. The apples are great for counting practice. When the kids are very small we use them to practice sharing and following directions. "Pick the apples and put them in mommy's hand...Put them back on the tree." They both loved doing that.
 Look! There's even a math section. The babies love the abacus beads. And despite many attempts, they've never freed any from the strands.
 Snap on shape and a kitty with a tied on collar. The Noodle loves the cat. He looks for it every time he opens this book.
 Football laces and a spinning seasons arrow-thingy.
 And a clock with spinning hands.
 Drawstring bags are simple to make and don't require any fancy techniques. Perfect for beginning sewers.
 Fold the top seams over another inch and iron.
 Sew along the bottom edge of the top fold to create the drawstring pocket.
 Snip the edge where the side seam will start, just below the top seam.
 Before sewing up the sides, I added the felt bowling pins and bowling ball to the front of the bag. I used scrap felt for the design.
 I pinned the pieces to the front.

 I love that felt doesn't fray. It makes it such an easy fabric to use for applique.
  Now we're ready to stitch up the sides and finish the bag. I sewed up the side edges with a 1/4" seam.
 Before turning the bag right side out, press the seam towards the back of the bag.
 Turn bag right side out.
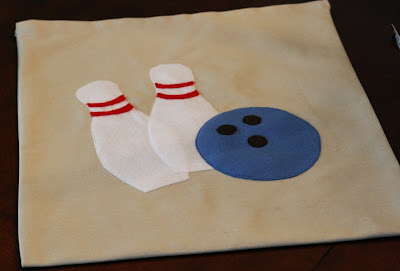 Using a safety pin as a guide, thread ribbon through the top seam on each side. Make sure your ribbon is several inches longer than the bag's width on each side.
 I knotted the ends of the ties together so they wouldn't get pulled out.
 The boys love doing these handprints. I've found the best way to not make a huge mess is to use a foam brush to paint the paint on the child's hand.
  Then, I have them press their handprints down on white computer paper, not the actual placemat paper. So if we get smudged prints, we don't have to redo the whole thing and waste a big piece of paper. Instead, I cut out each handprint and arrange them on the placemat paper with double stick tape.

 We're happy we'll have another placemat to add to our collection.

